Setting up a free KMS server for vCenter with PyKMIP (with database)
Hi everyone,
In this post, we will be deploying a PyKMIP server that stores its keys in a database. Unlike the docker container, the keys will be saved so on a reboot your keys are not lost.
So what exactly is this for? Well, in my use-case, I will be using this server to encrypted virtual machine files and drives.
For this tutorial, we will be using self-signed certs and this keys will be stored in a sqlite database. This is not secure at all! However, it will allow you to evaluate and learn the KMS functions within vCenter.
What we will need:
- Ubuntu Server 20.04 LTS installation ISO.
- One virtual machine to install Ubuntu Server 20.04 LTS on.
- A network connection to install some packages.
First what we do is we create a virtual machine. This is just how it’s always done. You create a Ubuntu VM and install Ubuntu on it, this should be straightforward.
Now comes the fun part. the green commands should be executed as a user, the red commands as root. Re-place <$username> with your regular account’s username.
sudo -i
apt-get update
apt-get upgrade
mkdir /usr/local/PyKMIP
mkdir /etc/pykmip
mkdir /var/log/pykmip
chown <$username>: -R /usr/local/PyKMIP
chown <$username>: -R /etc/pykmip
chown <$username>: -R /var/log/pykmip
apt-get install python3-dev libffi-dev libssl-dev libsqlite3-dev
openssl req -x509 -nodes -days 3650 -newkey rsa:2048 -keyout /etc/ssl/private/selfsigned.key -out /etc/ssl/certs/selfsigned.crt
Then fill out the form for the SSL certificate. The above certificate will be valid for 10 years. (3650 days)
chown <$username>: -R /etc/ssl/private
chown <$username>: /etc/ssl/certs/selfsigned.crt
exit
cd /usr/local
git clone https://github.com/OpenKMIP/PyKMIP
cd /usr/local/PyKMIP
sudo -i
python3 /usr/local/PyKMIP/setup.py install (be sure you are in the /usr/local/PyKMIP directory! See cd command above)
exit
nano /etc/pykmip/server.conf
Paste the following into the file: (replace x.x.x.x with your VM’s IP)
[server]
database_path=/etc/pykmip/pykmip.database
hostname=x.x.x.x
port=5696
certificate_path=/etc/ssl/certs/selfsigned.crt
key_path=/etc/ssl/private/selfsigned.key
ca_path=/etc/ssl/certs/selfsigned.crt
auth_suite=TLS1.2
policy_path=/usr/local/PyKMIP/examples/
enable_tls_client_auth=False
tls_cipher_suites= TLS_RSA_WITH_AES_128_CBC_SHA256 TLS_RSA_WITH_AES_256_CBC_SHA256 TLS_ECDHE_ECDSA_WITH_AES_256_CBC_SHA384
logging_level=DEBUG
Note for the code above, be sure that tls_cipher_suites, with the two TLS_RSA lines as well as the TLS_ECDHE line are all on one line, but separated by spaces. If you are confused, here is a link to a config file that is viewed raw.
Almost done! Now we need to edit our crontab to start the service at startup.
crontab -e
Paste the following in on a new line:
@reboot ( sleep 30s; python3 /usr/local/PyKMIP/bin/run_server.py & )This will make sure that it starts automatically on startup. Reboot your VM or type this in to start it as a background process:
python3 /usr/local/PyKMIP/bin/run_server.py &Now we need to go to our vCenter. We click on the vCenter and go to configure. Then under Key Providers, we click “Add Standard Key Provider”.
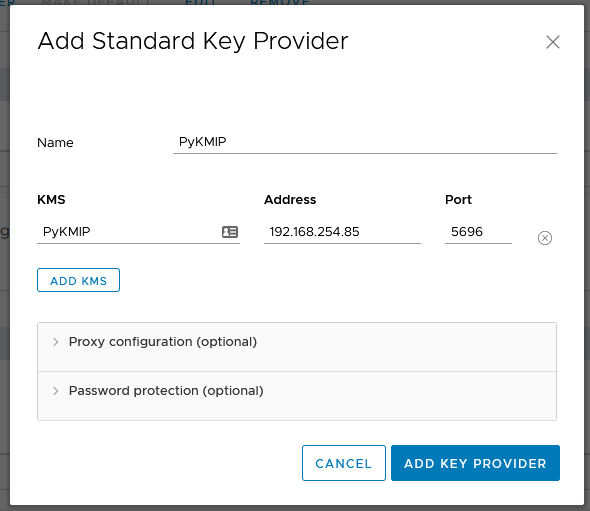
Give it a name under “Name” and “KMS”. Type in the IP address under “Address” and the port number, which by default is 5696 under “Port”. Then click on “Add Key Provider”.
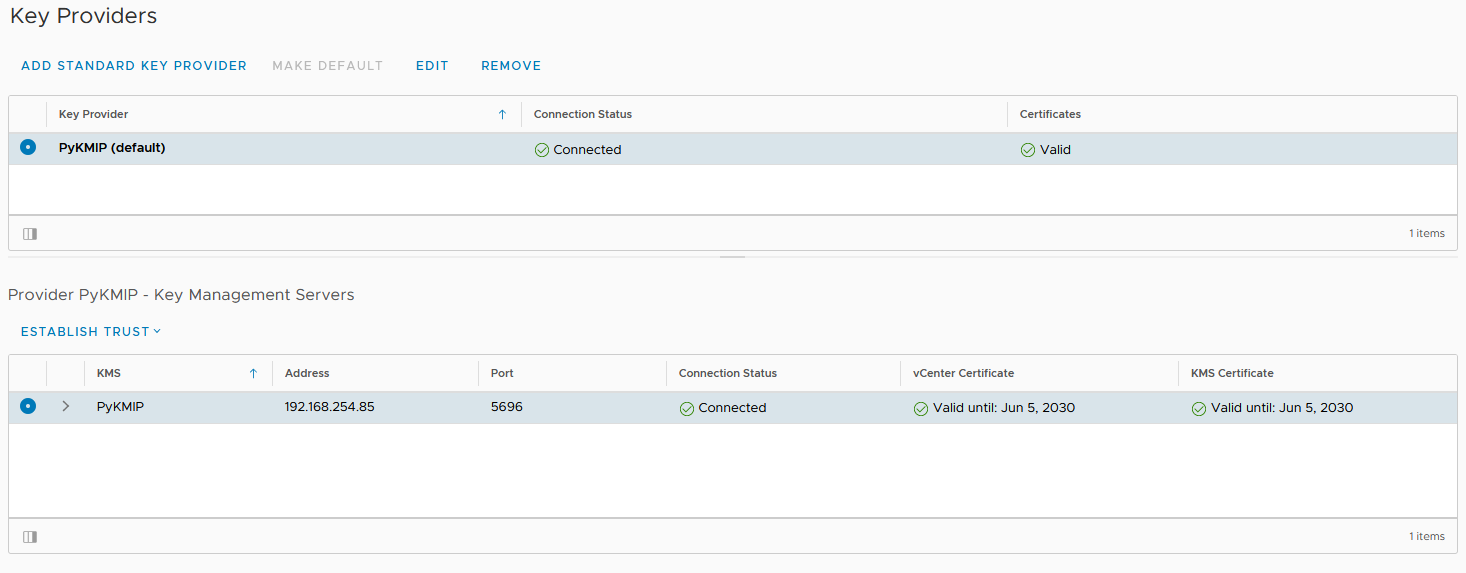
Once you have done that we need establish trust. Click on the Key Provider, then at the bottom click on the KMS server. Click on “Establish Trust” followed by “Make KMS trust vCenter”. Click on “KMS certificate and private key” and then on “Next”.
Now, we need to fill in the KMS certificate and private key. On the VM, run:
cat /etc/ssl/certs/selfsigned.crt
Paste the output (with the dashes!) under KMS certificate.
cat /etc/ssl/private/selfsigned.key
Paste the output (with the dashes!) under “KMS Private Key”.
Now click on “Establish Trust” and we’re done! Now you should be able to use your new KMS server in your lab!
If you want to somewhat tighten security, don’t use the self-signed certificate but use your own certificates and lock down access to the VM, since the database with all your VM keys sits as a file on the filesystem of the VM.
If you have any questions, feel free to contact me through email or Twitter.
Have a great day!